Continuous Integration and Continuous Delivery are an extremely important part of development lifecycle. Unfortunately, due to the lack of local environment and debugging features, pipelines development can be a bumpy road of frustration. Learn how Dagger solves these challenges!
Current status quo
Currently, when building a CI/CD pipeline, the most common way to define it is using YAML. Some providers, such as Azure DevOps, also offer a graphical interface. Once the set of tasks to be automated is defined, testing comes into play. However, it is a general rule in software engineering that things never work perfectly on the first try. While it is easy to validate the functionality of an application, like a web server, through automated tests or local execution, pipelines require committing the YAML configuration and running it on a remote server. This significantly extends the development time and it can be challenging to identify errors or debug problematic variables during execution.
The New Solution: Dagger
The Dagger team has decided to challenge this status quo by introducing Dagger
Dagger is a programmable CI/CD engine that runs your pipelines in containers.
If we break that one sentence into pieces:
Programmable
Dagger is a program that can be developed just like any other application. It allows running the pipeline on a local machine, leveraging the benefits of a favorite integrated development environment (IDE). Currently, Dagger offers three software development kits (SDKs) in Go, Node.js, and Python, along with GraphQL API and CLI. This flexibility allows developers to use their language of choice and seamlessly integrate it with the Dagger Engine using the GraphQL API.
In containers
The Dagger Engine executes pipelines within containers, eliminating dependencies and providing a consistent execution environment. This can be compared to the tasks available in other pipeline providers. For example, in Azure DevOps, you would use the dotnet task to build a .NET application, while in Dagger, you can utilize a Docker image such as mcr.microsoft.com/dotnet/sdk as the environment for a specific job.
Additionally, Dagger boasts superior caching capabilities, which is highly beneficial when implementing an efficient CI/CD strategy that involves multiple deploys per day. This caching feature is especially advantageous when running Dagger on your own machine.
To find out more about the tool itself I encourage to check the docs or Discord channel!
Example
The example I would like to present consist of sample Razor Pages ASP.NET Core application, which is build and deployed to Azure App Service. Everything done with Dagger and run using Github Actions. The source code can be found here.
I have decided to use Go SDK, since Dagger creators recommend it to:
A developer who needs CI/CD, and is looking for an excuse to learn Go.
Build
This step is relatively straightforward as it involves a sample application without any additional dependencies or tests. It begins by obtaining a reference to the directory where the application is located and a reference to the output directory. The next step is to create a container using the mcr.microsoft.com/dotnet/sdk:7.0 Docker image. The application directory is mounted onto the internal /app folder of the container, and the working directory is set to the /app/WebApp folder, where the WebApp.csproj file resides. With this basic setup, the necessary dotnet commands can be executed. Once the build and publish processes are successful, all generated files are saved in the internal /build folder. These files are then transferred back to the local machine’s output directory.
func build(ctx context.Context, client dagger.Client, outputDirectory string) error {

	dir := client.Host().Directory("./app")

	output := client.Directory()

	container := client.Container().
		From("mcr.microsoft.com/dotnet/sdk:7.0").
		WithMountedDirectory("/app", dir).
		WithWorkdir("/app/WebApp")

	container = container.
		WithExec([]string{"dotnet", "build", "-c", "Release"}).
		WithExec([]string{"dotnet", "publish", "-c", "Release", "-o", "/build"})

	output = output.WithDirectory(".", container.Directory("/build"))

	_, err := output.Export(ctx, outputDirectory)
	if err != nil {
		return err
	}
	return nil
}
It is important to note that the actual execution happens only after calling Export (there are couple more which triggers the process) method on dagger.Container.
Continuous integration
To incorporate the build method continuously in the CI process, a ci.yml workflow has been created. One of the advantages of Dagger is its simplicity as a Go program, which requires only the installation of the Go runtime, a straightforward process.
The ci.yml workflow consists of three steps:
- Go Installation: This step ensures the presence of the Go runtime.
- Execution of main.go with Command Parameters: This step executes the
main.gofile, passing the necessary command parameters. Here thebuildmethod is invoke to perform the build process. - Artifact Upload: After the completion of the build process, this step uploads the resulting artifact. The uploaded artifact can later be utilized during Azure deployment.
By implementing this workflow, the build method will be continually triggered whenever new commits are made to the repository’s master branch. This ensures that the codebase is consistently built as an integral part of the CI process.
name: Continous Integration

on:
  push:
    branches: [ "master" ]
    paths-ignore:
      - ".github/workflows/cd.yml"
      - "scripts/**"
  pull_request:
    branches: [ "master" ]

env:
  OUTPUT_DIR: ./build

jobs:

  build:
    runs-on: ubuntu-latest
    steps:
    - uses: actions/checkout@v3

    - name: Set up Go
      uses: actions/setup-go@v3
      with:
        go-version: ">=1.20"

    - name: Build Application
      run: go run main.go -m ci -o ${{ env.OUTPUT_DIR }}

    - name: Upload Build Artifact
      uses: actions/upload-artifact@v3.1.2
      with:
        name: build_artifact
        path: ${{ env.OUTPUT_DIR }}
Deployment
When it comes to deploying to Azure WebApp without introducing additional dependencies, the choice of tools is crucial. Initially, I attempted to utilize the Go SDK for Azure; however, I encountered limitations when it came to deploying from a zip file to Azure WebApp. This approach would have required the external dependency of MSDeploy, commonly available in Visual Studio, to accomplish the task effectively. Avoiding the introduction of additional dependencies became a priority, leading me to explore alternative solutions.
Given my familiarity with PowerShell from working in a .NET environment, I decided to leverage the Azure PowerShell capabilities. The Azure PowerShell module provides extensive functionalities for interacting with Azure resources and enables seamless deployments. With that in mind I turned to the Azure PowerShell Docker image as my deployment pipeline base environment.
After creating a container from the mcr.microsoft.com/azure-powershell image and mounting the directory containing all related scripts, the next step is to ensure that the client is authorized to access the necessary Azure resources. To achieve this, you can use the GetAzPwsh method, which not only sets up the base environment, but also executes a script to log in to Azure using a Service Principal.
A Service Principal is an identity entity in Azure that can be granted access to specific resources. It is commonly used in deployment pipelines to authenticate and authorize actions performed by the pipeline.
By executing the script within the GetAzPwsh method, the container is authenticated with the necessary permissions to access Azure resources.
type AzureServicePrincipal struct {
	TenantId     string
	ClientId     string
	ClientSecret string
}

func GetAzPwsh(client dagger.Client, servicePrincipal AzureServicePrincipal) *dagger.Container {

	scriptsDir := client.Host().Directory("./scripts/")

	container := client.Container().
		From("mcr.microsoft.com/azure-powershell").
		WithMountedDirectory("/scripts", scriptsDir).
		WithWorkdir("/scripts")

	// use reflection to loop through properties of service principal and set them as secrets in container
	servicePrincipalReflect := reflect.ValueOf(&servicePrincipal).Elem()
	for i := 0; i < servicePrincipalReflect.NumField(); i++ {
		field := servicePrincipalReflect.Field(i)
		name := servicePrincipalReflect.Type().Field(i).Name
		secret := client.SetSecret(name, field.String())
		container = container.WithSecretVariable(name, secret)
	}

	return container.
		WithExec([]string{"pwsh", "utilities/AzLogin.ps1"})
}
The deployment process consists of two stages:
- Deployment to the staging slot: The application is deployed to a staging slot where it can undergo manual or automated testing. This allows for checking if the application behaves as expected before promoting it to the actual production environment.
- Slot swapping: After successful testing in the staging slot, the next step is to swap the staging slot with the production slot. This operation replaces the content in the staging slot with the production version, effectively making the new version live. The ability to revert changes is also provided by easily swapping back the slots in case any issues arise during the final stage of deployment.
The first stage of the deployment process involves preparing the runtime environment, which is already authenticated to Azure. Additionally, the package containing the built application is required. To achieve this, the /publish directory, which contains the build artifact, is mounted into the container.
At this point, the Powershell scripts come into play. To ensure a proper sequence of execution, I have created folders for each deployment stage (such as “deploy” and “staging”) and named them accordingly. In the “deployToStaging” stage, I perform the following actions:
- Creation of resources: If the required resources do not exist yet, I create them during this stage.
- Deployment to staging slot: Using the
Publish-AzWebAppcmdlet, I deploy the zipped artifact to the staging slot and start the slot itself. - Warm-up and verification: To ensure the deployment was successful, I perform a warm-up operation and verify that the default URL of the staging slot returns a success HTTP status code.
func deploy(ctx context.Context,
	client dagger.Client,
	artifactPath string,
	artifactName string,
	stepsFolder string,
	azureServicePrincipal azure.AzureServicePrincipal,
	deploymentVariable azure.DeploymentVariables) error {

	container := azure.GetAzPwsh(client, azureServicePrincipal)

	publishDir := client.Host().Directory(artifactPath)
	container = azure.SetDeploymentVariables(container, deploymentVariable).
		WithMountedDirectory("/publish", publishDir).
		WithEnvVariable("ArtifactName", artifactName)

	stepsPaths, err := getStepsPaths(stepsFolder)
	if err != nil {
		return err
	}

	for _, path := range stepsPaths {
		container = container.WithExec([]string{"pwsh", path})
	}
	_, err = container.ExitCode(ctx)

	if err != nil {
		return err
	}
	return nil
}
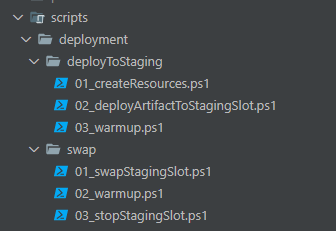
The swap stage follows a similar process, but it skips the step of mounting the artifact into the container. Instead, it solely focuses on executing Azure PowerShell scripts to perform the following actions:
- Swap staging with production: The script handles the swapping of the staging slot with the production slot, making the new version live in the production environment.
- Warm up the production slot: To ensure that the production slot is ready to serve traffic, a warm-up operation is performed to bring it up to speed. This is similar to the warm-up step in the deployment stage.
- Close the staging slot (optional): Depending on the requirements, the staging slot can be closed after the swap is completed. This step is not necessary in all cases, but it provides the flexibility to remove the staging environment if it is no longer needed.
By executing these Azure PowerShell scripts in the swap stage, the staging slot is seamlessly swapped with the production slot, the production environment is warmed up, and the staging slot can be closed if desired. This enables a smooth transition of the new version to the production environment while maintaining control over the staging environment.
func swap(ctx context.Context,
	client dagger.Client,
	stepsFolder string,
	azureServicePrincipal azure.AzureServicePrincipal,
	deploymentVariable azure.DeploymentVariables) error {

	container := azure.GetAzPwsh(client, azureServicePrincipal)

	container = azure.SetDeploymentVariables(container, deploymentVariable)

	stepsPaths, err := getStepsPaths(stepsFolder)
	if err != nil {
		return err
	}

	for _, path := range stepsPaths {
		container = container.WithExec([]string{"pwsh", path})
	}
	_, err = container.ExitCode(ctx)

	if err != nil {
		return err
	}
	return nil
}
An important part of both stages is the use of the SetDeploymentVariables method:
container = azure.SetDeploymentVariables(container, deploymentVariable)
This method plays a crucial role in providing the necessary data to the PowerShell scripts used for resource creation and deployment. Since the scripts are fetched dynamically, it becomes challenging to predict which step requires which parameter manually.
Fortunately, Dagger offers a solution by allowing the injection of environment variables into the container. By leveraging this feature, I can set the required variables in the container and reference them within the PowerShell script using the syntax:
$variable = $env:VariableName
func SetDeploymentVariables(container *dagger.Container, deploymentVariable DeploymentVariables) *dagger.Container {

	container = container.WithEnvVariable("ResourceGroupName", deploymentVariable.ResourceGroupName).
		WithEnvVariable("WebAppName", deploymentVariable.WebAppName).
		WithEnvVariable("Location", deploymentVariable.Location)

	return container
}
Continuous delivery
Once the local testing is completed, it’s time to set up the GitHub Actions workflow. The workflow consists of two jobs, where the second job depends on the first one. This dependency ensures that the swap job runs only after the first job (deploy) has been successfully completed.
Similar to the CI workflow, the Go runtime is installed in both jobs, and the main.go file is executed with the required command parameters. However, the deploy job has an additional step that involves downloading the build artifact created during the Continuous Integration stage.
name: Continous Delivery

permissions:
  id-token: write
  contents: read
  actions: read
  issues: write

env:
  ARTIFACT_DIR: publish
  ARTIFACT_NAME: build_artifact
  RESOURCE_GROUP: dagger-test
  WEB_APP: dagger-webapp
  LOCATION: west europe

jobs:
  deploy:
    runs-on: ubuntu-latest
    steps:
      - uses: actions/checkout@v3

      - name: Set up Go
        uses: actions/setup-go@v3
        with:
          go-version: ">=1.20"

      - name: Download CI workflow artifact
        uses: dawidd6/action-download-artifact@v2.27.0
        with:
          workflow: ci.yml
          name: ${{ env.ARTIFACT_NAME }}
          path: ${{ env.ARTIFACT_DIR }}
          skip_unpack: true

      - name: Deploy to staging slot
        run: |
          go run main.go -m cd \
                         -s tenantId=${{ secrets.AZURE_TENANT_ID }} \
                         -s appId=${{ secrets.AZURE_APP_ID }} \
                         -s password=${{ secrets.AZURE_PASSWORD }} \
                         -v ResourceGroupName=${{ env.RESOURCE_GROUP }} \
                         -v WebAppName=${{ env.WEB_APP }} \
                         -v Location=${{ env.LOCATION }} \
                         -v ArtifactName=${{ env.ARTIFACT_NAME }}.zip \
                         -a ${{ env.ARTIFACT_DIR }} \
                         -f deployToStaging
  swap:
    runs-on: ubuntu-latest
    needs: deploy
    steps:
      - uses: actions/checkout@v3

      - name: Set up Go
        uses: actions/setup-go@v3
        with:
          go-version: ">=1.20"

      - uses: trstringer/manual-approval@v1
        with:
          secret: ${{ github.TOKEN }}
          approvers: pbakun
          issue-title: "Deploying application to prod from staging"
          issue-body: "Please approve or deny the deployment for application."

      - name: Swap staging and production slot
        run: |
          go run main.go -m cd \
                          -s tenantId=${{ secrets.AZURE_TENANT_ID }} \
                          -s appId=${{ secrets.AZURE_APP_ID }} \
                          -s password=${{ secrets.AZURE_PASSWORD }} \
                          -v ResourceGroupName=${{ env.RESOURCE_GROUP }} \
                          -v WebAppName=${{ env.WEB_APP }} \
                          -v Location=${{ env.LOCATION }} \
                          -f swap
Summary
The example itself is a simple case, which could be easily solved without Dagger. I should note that during the process of preparing the example I also had the opportunity to try out GitHub Actions for the first time. Here comes the magic… As soon as I pushed it to the remote repository the pipeline jobs just worked. I only encountered some minor issues related to artifact handling, but the actual deployment process went smoothly.
I hope you found this post valuable. The full source code is available in the repository. I encourage to check it out, as I haven’t included the entire source code here. Lastly, a big thumbs up to Dagger team for building such a great tool which already has huge capabilities. I’m confident there is even more to come in the future!